用VIM搭建编程环境
2009年2月27日 06:21 | Comments(0) | Category:开发工具 | Tags:
自从大牛介绍VIM给我以来,我用VIM也已经有1年多的时间了。由于天分不高,再加上生性懒惰,所以一直也只是把VIM当作一个编辑器来用,当调试或者在代码之间穿插浏览的时候,就用最土的方法,打开终端,一步一步地来;需要找一个函数定义的时候,又不得不手动打开该函数所在的头文件... 总之浑浑噩噩地这一年是混下来了。
这两天终于下定决心要好好搭一下VIM的编程环境,使得今后的开发更加顺手。于是乎先从大牛推荐的插件开始一个一个安装。
大牛推荐的插件很多,我就先从自己最需要的简单插件开始:
1. A
这个插件就不用说啦,很简单但是非常有用,用于在同名的头文件和源文件之间快速跳转。
2. Tag List
这个插件用于显示当前文件中所有宏、类、结构、函数等等的列表,相当于VS中的类视图。这个插件依赖于ctags,网上很多人推荐 EXUBERANT CTAGS,大牛也说这个比内置的ctags功能更强大,于是俺就装它了。网上提供的release竟然只有.rpm的,只好用alien先转换成.deb格式,然后再 dpkg -i 之了(因为俺用Ubuntu)。
3. WManager
这是一个在VIM中用一个小窗口显式当前目录所有文件和文件夹的插件,有了它,你就可以在不离开VIM的情况下,方便地浏览工程的目录,打开其他文件。默认情况下这个插件需要依赖于bufExplorer,如果你嫌下载bufExplorer比较麻烦,可以在你的.vimrc中添加
这样就可以直接使用WManager了。
4. gdbvim
这是个很牛的插件,可以把gdb和VIM结合起来,用netBeans在他们之间通信,然后可以相互调用对方的命令。不过大牛说现在都流行用clewn了,于是乎俺也就装了它。
现在,安装工作可以先告一段落了,下面是相关的配置和使用。
1. Tag List 相关配置
在.vimrc中添加下面两行,用于设定Taglist的起始位置和折叠选项:
let Tlist_File_Fold_Auto_Close=1
2. WManager 相关配置
设置WManager使用的文件浏览工具,以及其他快捷键映射:
map <C-W><C-F> :FirstExplorerWindow<CR>
map <C-W><C-B> :BottomExplorerWindow<CR>
map <C-W><C-T> :WMToggle<CR>
3. 插件们的用法
3.1 A
这个是最简单的,只要在VIM的命令模式下键入":A"回车即可。
3.2 Tag List 和 ctags
要使用Tlist,首先得有tags文件。在你的项目的最上层目录运行
这样会在该目录下生成一个名为"tags"的文件,里面存放了所有源代码中涉及到的tags信息。记得每次当你添加或删除了函数、类等等之后,要重新生成tags。
假设当前目录下有build/和src/目录,你想让ctags生成src/目录下的信息,而忽略build/文件夹,除了可以直接用"$ ctags -R src"之外,还可以用
注意:这里"--exclude=.."一定要在"-R *“之前,否则会不起作用。俺就是在这折腾了半天,试过无数次才搞明白... 话说ctags这个程序就不能聪明一点么
再注意:ctags默认的行为是只记录函数或者类的定义,而不记录声明的位置信息,所以俺和大牛一样,强烈建议你在/usr/local/bin目录下创建一个自己的可执行文件:
# Filename: ctagsplus
ctags --c++-kinds=+px --fields=+iaS --extra=+q "$@"
这样,你以后就可以快速执行修改过的ctags命令了:
ctags的用法:光标处Ctrl-]键:跳到光标所在单词的tag;Ctrl-T键:跳回原来的位置。g-]键(先按g再按]):如果有同名的多个tag,可以用这两个键进行跳转,会提示选择序号。
Tag List插件的使用比较简单,记住常用的命令就行了:
使用":Tlist","TlistClose"来打开和关闭Tag List窗口,使用"Ctrl+]"和"Ctrl+T"跳转到光标所在处函数的定义以及跳回。
3.3 WManager
这个东东比较傻瓜,如果你是在gVim下那就直接用鼠标双击你要打开的文件或目录;如果是在终端窗口的VIM中,把光标移到该文件或目录上再回车即可。
3.4 clewn
clewn的使用就稍微麻烦一些了,需要记住一些常用命令。假设你有一个test.cpp文件,以及用g++ -o test -g test.cpp生成的可执行文件test:
调用clewn,指定你想让gVim打开的源文件,以及让gdb运行的可执行文件:
...
(gdb) file test
或者
当然你也可以只指定可执行文件名,在跳出来的gVim中再用":e test.cpp"打开你想打开的源文件。
然后就是一些clewn的默认快捷键,贴在下面:
CTRL-Z send an interrupt to GDB and the program it is running
B info breakpoints
L info locals
A info args
S step
I stepi
CTRL-N next: next source line, skipping all function calls
X nexti
F finish
R run
Q quit
C continue
W where
CTRL-U up: go up one frame
CTRL-D down: go down one frame
cursor position: ~
CTRL-B set a breakpoint on the line where the cursor is located
CTRL-E clear all breakpoints on the line where the cursor is located
mouse pointer position: ~
CTRL-P print the value of the variable defined by the mouse pointer
position
CTRL-X print the value that is referenced by the address whose
value is that of the variable defined by the mouse pointer
position
CTRL-K set a breakpoint at assembly address shown by mouse position
CTRL-H clear a breakpoint at assembly address shown by mouse position
CTRL-J add the selected variable at mouse position to the watched
variables window
3.5 vimgrep
vimgrep并不是一个插件,而是VIM自带的一个命令,因为它跟VS的"在项目中搜索"功能很像,因此列在这里。vimgrep可用于在工程的多个文件中搜索你想要的字符串,如
:vimgrep foo_bar include/*.cpp
:vimgrep /\<foo_bar\>/ include/*.cpp
当你需要递归搜索某目录的时候,用"**"
:vimgrep MyClass myproject/**/*.h
4. 我的.vimrc
set number
" Tab related
set ts=4
set sw=4
set smarttab
set et
set ambiwidth=double
" Format related
set tw=78
set lbr
set fo+=mB
" Indent related
set ai
" Remove other autocmd settings
autocmd!
" Set C & C++ source file indent rules
autocmd BufNewFile,BufRead *.h,*.cpp,*.c,*.cxx set cin | set cino=:0g0t0(susj1(0 | set cinkeys-=0#0{0}
" Misc
set wildmenu
" set spell
set vb t_vb=
set incsearch
" Encoding ralated
set encoding=utf-8
let &termencoding=&encoding
set langmenu=zh_CN.UTF-8
language message zh_CN.UTF-8
" set fileencodings=ucs-bom,utf-8,cp936,gb18030,big5,euc-jp,euc-kr,latin1
set fileencodings=utf-8,chinese
" Display related
set ru
set sm
"set hls
if (has("gui_running"))
set guioptions+=b
colo torte
set nowrap
else
colo ron
set wrap
endif
syntax on
" Functions
command -nargs=1 Margin exec "match Error /.\\%>" . (<args> + 1) . "v/"
command -nargs=0 NoMargin match none
Margin 80
" Mappings
"
" Add '> ' at the beginning of every line
nmap <C-F1> :%s/^/> <CR>
" Replace all pure empty lines by an empty line with white space
nmap <C-F2> :%s/^$/ <CR>
" Find previous empty line (or to say, the beginning of a paragraph)
nmap <C-F3> ?^ *$<CR>
" Find next empty line (or to say, the end of a paragraph)
nmap <C-F4> /^ *$<CR>
" Find next line with more than 80 characters
nmap <C-F5> /^.\{81,}$<CR>
nmap <C-F7> :NoMargin<CR>
nmap <C-F8> :Margin 80<CR>
nmap <C-F9> :set spell<CR>
nmap <C-F10> :set nospell<CR>
nmap <C-F11> :set hls<CR>
nmap <C-F12> :nohl<CR>
" Font
set guifont=Bitstream\ Vera\ Sans\ Mono\ 10
" ======================= Plugins ==========================
"
" WinManager related
let g:winManagerWindowLayout = "FileExplorer"
map <C-W><C-F> :FirstExplorerWindow<CR>
map <C-W><C-B> :BottomExplorerWindow<CR>
map <C-W><C-T> :WMToggle<CR>
" gdbvim related
set noshowcmd
" Tlist
let Tlist_Use_Right_Window=1
let Tlist_File_Fold_Auto_Close=1
" ======================= Modes ==========================
function EnglishMode()
set imactivatekey=
set noimcmdline
set iminsert=0
set imsearch=0
setlocal spell
endfunction
command -nargs=0 EnglishMode call EnglishMode()
function ChineseMode()
set imactivatekey=C-space
set noimcmdline
set iminsert=2
set imsearch=2
setlocal nospell
endfunction
command -nargs=0 ChineseMode call ChineseMode()
function TextMode()
setlocal nocin
setlocal nosm
setlocal noai
setlocal tw=78
endfunction
command -nargs=0 TextMode call TextMode()
function CodeMode()
setlocal cin
setlocal sm
setlocal ai
setlocal tw=78
setlocal nospell
endfunction
command -nargs=0 CodeMode call CodeMode()
function CodeLayout()
call CodeMode()
Tlist
WManager
endfunction
command -nargs=0 CodeLayout call CodeLayout()
function CodeLayoutClose()
call CodeMode()
TlistClose
WMClose
endfunction
command -nargs=0 CodeLayoutClose call CodeLayoutClose()
" ======================= Functions ==========================
function DisplayQuickfixAtBottom()
botright cwindow
endfunction
command -nargs=0 CW call DisplayQuickfixAtBottom()
function SetMakeprg(arg)
exec "set makeprg=".a:arg
endfunction
command -nargs=1 Make call SetMakeprg(<q-args>)
其实大部分都是从大牛的.vimrc那里拷贝来的,根据我的个人爱好在一些细节的地方做了一些改动,同时添加了几个函数。比较重要的,跟本文比较相关的几个模式和函数如下:
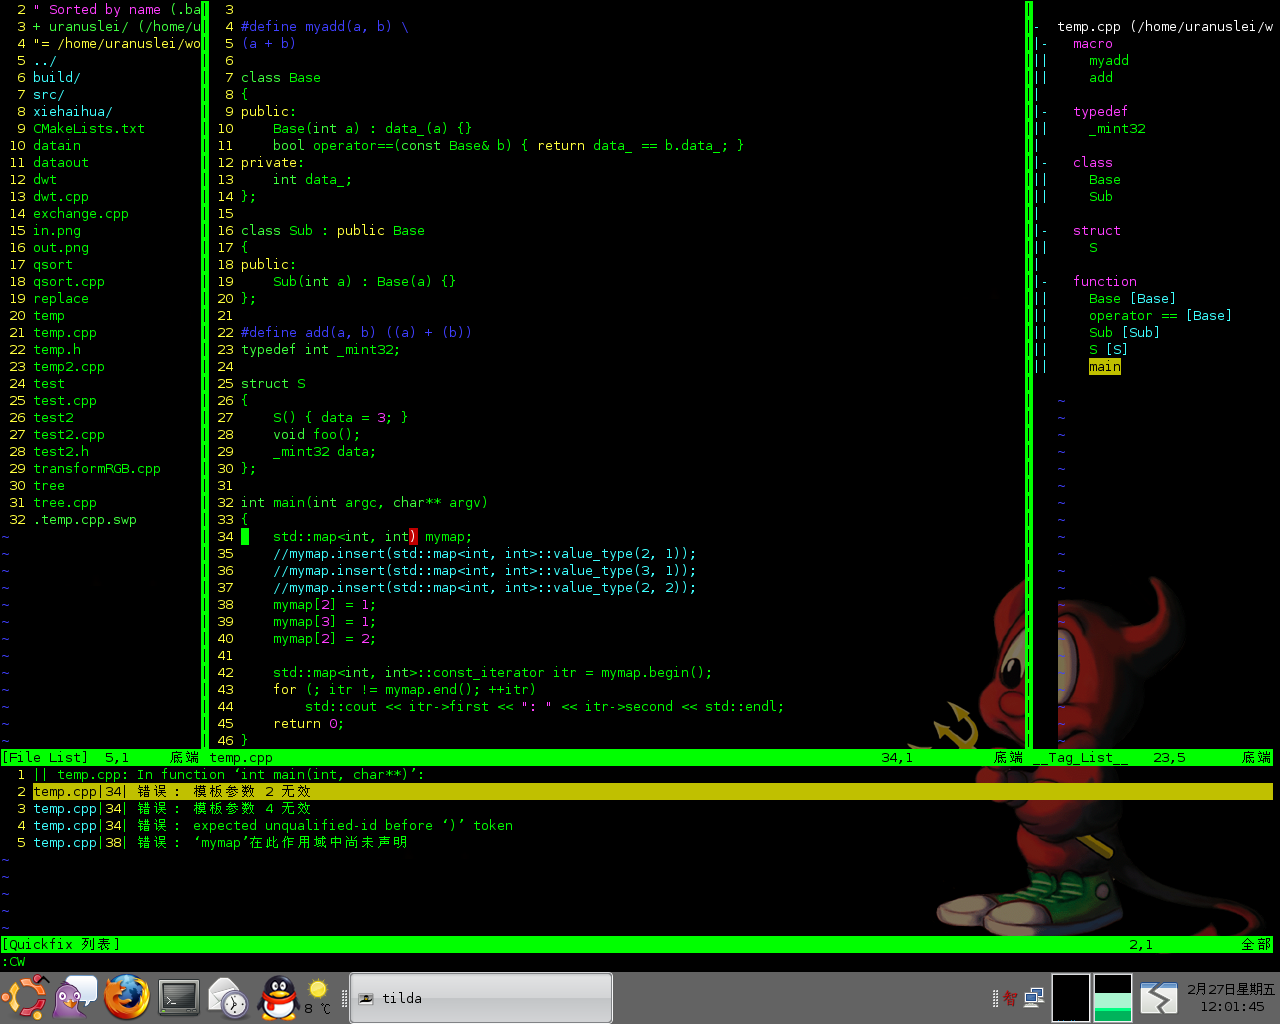
CodeLayout:在VIM中键入":CodeLayout"回车,即可同时打开WManager(左边)和Taglist(右边),看上去很酷,是大牛写的;
CodeLayoutClose:在VIM中键入":CodeLayoutClose"回车,即可把上述两个窗口关闭,这个是俺添加的;
CW:在VIM中键入":CW"回车,即可在窗口的最下方显示编译错误信息,这个也是俺添加的,由于默认的":cw"是在右下角打开quickfix的错误列表,在CodeLayout中最右边是TagList窗口,很窄,所以错误列表窗口也很窄,我觉得很不爽,查了半天手册终于找到了botright这个命令;
Make:在VIM中键入":Make your_args"回车,即可根据你的需要设置编译命令,然后再键入":make"即可在VIM中进行编译了。这个函数也是俺添加的,主要是因为":set makeprg="比较长,也不容易记。这里的"your_args"可以是任意命令,如"g++\ -g\ -o\ temp\ temp.cpp"(注意这里的空格需要用\来转义),甚至是你写的一个脚本的名字,如"util\/builddebug.sh"等等;
恩,写的差不多了,以后想到了再添加吧。截个图如下: